Guides / Selling a Home
How to Stage a Home for Sale: A Photography-First Guide
Premium home staging in 2026 starts with the photos, not the walkthrough. A practical guide to staging tactics, ordered by cost-to-impact, with honest budgets and where virtual staging closes the gap.
The short answer
Modern staging is two things: helping the listing photos earn the click in search, and helping in-person visitors feel "this could be mine" in the first thirty seconds. Everything else serves one of those two goals.
For most single-family homes the highest-ROI moves are free or nearly so: declutter, deep clean, depersonalize, and let in light. If the home is vacant, dated, or competing in a slow market, layering on neutral paint, considered furniture placement, and — where physical staging isn't practical — virtual staging is what closes the gap.
1. Declutter ruthlessly before anything else
Nothing you buy, paint, or rent compensates for a cluttered home. Buyers read clutter as "not enough storage," which is one of the top deal-killers in feedback surveys. The benchmark most stagers use is simple: every surface is either functional or intentionally decorative. Nothing in between.
- Countertops: clear everything except one or two styled items — a cutting board with fruit, a kettle, fresh flowers.
- Closets: remove at least a third of what's inside. Buyers open closets and mentally fit their belongings; an over-stuffed closet reads as too small.
- Bookshelves: roughly 60% books, 40% negative space and objects. A packed shelf reads as cramped.
- Refrigerator doors: nothing. No magnets, no kids' drawings, no calendars.
Rent a small storage unit for the duration of the sale. It runs $100–$200 per month and removes the temptation to cram displaced items into closets or the garage — both of which buyers inspect closely.
2. Deep clean every surface
"Clean" in staging terms is more thorough than clean in living terms. The cleaner the home, the more buyers unconsciously read it as well-maintained overall, even in areas they don't inspect closely. The reverse is also true: a single grimy grout line in a bathroom can flip a buyer's read of the whole property from "move-in ready" to "needs work."
Hire a professional deep clean for $400–$700. Ask specifically for baseboards, inside ovens, grout, ceiling fans, vents, and window tracks — the things buyers notice but homeowners rarely touch. Then keep a lighter cleaning routine so the home stays showing-ready; surprise showings are common, and a last-minute scramble rarely catches the kitchen.
3. Depersonalize so the buyer can picture themselves
Buyers need to imagine their own life in the space. The more of yours they see, the harder that becomes. Pack away family photos, religious or political iconography, trophies and diplomas, kids' art, and pet supplies during showings. It is emotionally hard — the home stops feeling like yours, which is exactly the point. Sellers who resist this step almost always see longer days-on-market.
4. Maximize natural light in every room
Bright homes photograph better and feel bigger in person. Light is one of the first things buyers comment on in walkthroughs — "so bright" is a leading indicator of an offer; "a bit dark" is a leading indicator of a pass. Wash windows inside and out before photos are taken, replace heavy curtains with sheer panels, and swap dim bulbs for daylight-balanced LEDs at the highest lumen count the fixture allows.
For shoot day specifically, schedule photography for the time of day when each room receives the most natural light. A photographer-led walkthrough the day before pays for itself.
5. Neutralize paint and finishes
Bold paint is taste-specific and narrows the buyer pool. Repainting the most visible rooms in warm neutrals is one of the highest-ROI dollar spends on this list. Stick to off-whites, soft greiges, and quiet warm tones. The goal is to disappear, not to decorate.
For pre-listing decisions, render two or three paint variants of the same wall on the actual photo before committing. The render is the conversation, not a generic mood board.
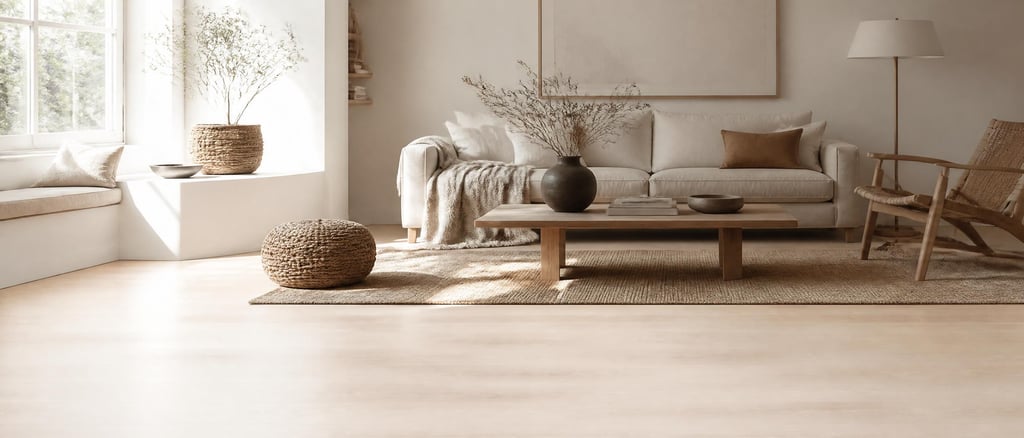
6. Arrange furniture for the photo, not for daily use
Living-room furniture that's arranged for evenings on the couch is rarely arranged for photographs. Photo-first arrangement pulls furniture off walls and into floating conversation groupings, opens sight lines on the longest wall of the room, and uses fewer pieces, not more. The wider the negative space, the bigger the room reads.
For oversized pieces or pieces that fight the room, virtual staging is a faster fix than renting alternatives. Keep the bones of the room and re-stage digitally for the photo.
7. Invest in curb appeal
The exterior is the first photo most buyers see in search and the first impression at a showing. Mow, edge, and mulch the front yard. Replace any dated light fixtures by the door. Repaint the front door if it's scuffed. For a tired lawn or a sky that came out flat on shoot day, render the fix on the listing photo rather than waiting for the season to turn.
8. Use virtual staging for empty or outdated rooms
Virtual staging is the right tool for vacant listings, badly furnished rooms, and off-season relaunches. Look for renderings with photographer-grade output — true scale, honest light, materials that read as the materials they would actually be. A staged photo that screams "staged" converts worse than the empty room it replaced.
9. Match the staging budget to the price tier
A $500K starter home and a $5M custom listing don't share a staging budget. As a starting point: spend roughly 0.5%–1% of the asking price on staging at lower tiers (mostly cleaning, neutral paint, and selective virtual staging), 1%–1.5% in the middle (light professional setup plus virtual fill-in for empty rooms), and 1.5%–2.5% at the top (full physical staging by a designer, plus considered virtual work for the marketing variants).
Beyond a certain spend, the marginal click on the listing photo is what determines ROI — not how much furniture got rented. That's where photographer-grade renders earn their keep.
Topics
Related guides
- Selling a House with Tenants In It: A Practical GuideSelling an occupied rental is a different problem from selling a vacant home. A practical guide to navigating tenant rights, scheduling photography around occupancy, and using virtual decluttering to keep listings competitive.
- Airbnb Listing Photos That Book More Guests: A Host's Photo Upgrade PlaybookThe cover photo decides most of an Airbnb booking. A practical guide to the four most common listing-photo problems short-term rental hosts have, matched to the fastest fix that respects the room.
Frequently asked
How much does it cost to stage a home for sale?
A DIY refresh — clean, declutter, neutral paint in one or two rooms, considered accessories — usually lands between $400 and $1,200. A stager consultation is $200–$500 for an hour or two of advice you then execute yourself. Full physical staging of an occupied home typically runs $2,000–$4,000 for setup, and vacant-home rental staging often runs $3,000–$8,000 a month on mid-range homes, more in luxury. Virtual staging is the outlier — usually $20–$60 per photo at premium tiers — which is why it has become the default for empty rooms and pre-listing iteration.
Does staging actually help a home sell faster?
Industry surveys from NAR and large brokerages consistently report shorter days-on-market and higher sale-to-list ratios on staged homes versus comparable unstaged ones — and the effect is largest on vacant listings. The mechanism is the listing photos: staging makes them click-worthy in search, and stronger initial demand is what drives the faster sale.
Can I stage my home myself?
Yes. The four highest-leverage moves — deep cleaning, decluttering, depersonalizing, and letting in natural light — are all DIY and account for most of the impact. Where homeowners struggle is furniture placement (we lay rooms out for living, not for photos) and color decisions. A one-hour stager consultation plus your own execution is often the best cost-to-result ratio outside of luxury.
What if my home is empty?
Empty rooms photograph badly — they read smaller than they are, scale is lost, and the listing comes across as cold. Three options: rent furniture and stage physically (expensive), leave it empty and discount accordingly (rare), or virtually stage the listing photos. Virtual staging is now standard for vacant listings; the only rule is the underlying space — walls, floors, layout — must be shown accurately.
Which rooms should I prioritize?
Living room, primary bedroom, and kitchen account for roughly 80% of buyer perception in most surveys. If the budget is limited, spend it there and leave secondary bedrooms lightly staged or empty-but-clean. Bathrooms need to be clean and neutral but rarely justify heavy staging spend.
Is virtual staging considered deceptive?
Not when disclosed and used accurately. Most U.S. MLS rules explicitly allow virtual staging when the photo carries a disclosure (e.g., "virtually staged") and the underlying space — walls, floors, windows, layout — is shown truthfully. What crosses the line is hiding flaws or inventing features. Adding furniture and décor to an otherwise accurate photo is fine.
How long before listing should staging start?
Two to three weeks. Week one is decluttering, deep cleaning, and small repairs. Week two is staging — paint, furniture, accessories. Photography is the last step, once everything is in place. Rushing compromises the photos, which are the single most important asset of the listing.
About the author
Vestaro Studio
The editors at Vestaro
The Vestaro studio publishes guides on real estate photography, virtual staging, and the business of selling a listing through the photos that lead it. Pieces are written by the team — photographers who shoot listings, engineers who train the staging models, and agents who use the output to close deals — and edited together before they ship.
We write from the field rather than from a content calendar. When a guide references a price, a turn-time, or an MLS rule, that number reflects what the team has observed across the listings we render each week. Where a topic touches a market we don't sell into, we say so.